Class 455/9 EMU
Christopher Ibbotson
6th June 2020
7 minutes

The Class 455 four car multiple unit has for many of our members been the workhorse of their commutes and trips on the suburban ‘southern’ region. Here Chris outlines the prototype history and how he’s constructed the Bratchell Models kit to represent a South West Trains unit in OO gauge, with its colourful but tricky livery.
The Prototype
In the early 1980s, a batch of new Electric Multiple Units (EMU) was ordered by BR’s Southern Region, to be based at Wimbledon depot. These were planned as replacement suburban electric units and were constructed at BREL York and delivered from 1983 onwards. The original plan was to number the units as Class 510, which was changed before delivery and the Class 455/8 units were numbered from 455801 to 455874 and followed normal SR practice of dropping the leading two digits. These units were a radical departure from the existing SR units such as the 2 and 4HAPs, EPBs and SUBS which they replaced. The newcomers used the proven and adaptable 20 metre steel construction Mk3 bodyshell, rode on airbag suspension, had sliding doors and were fitted with Tightlock couplers. The only commonality with the old order was the choice of traction motor, English Electric 507 and the 750v DC power supply.
Following delivery, the units settled down onto the South Western Division services from London Waterloo to Woking, Guildford, Hampton Court, etc. In 1984, the design was refined for the second batch of units to be delivered, the 455/7s. Numbered from 455701 to 455743, these had a modified, more pleasing design of front end, which was used on later builds of Electric and Diesel Multiple Units such as the Class 150s and 317/2 and 318. The unpowered Trailer Second for the 455/7s was taken from the Class 508 units that were transferred north to Merseyrail services and stand out from the other 455 cars due to the different, flatter body profile. Again these were allocated to South Western Division services. The Class 455/9 were the last order for the class, being delivered from March 1985. These had new build TS cars and a number of differences: additional roof ventilators due to the moving of heating equipment from roof level to floor level, no roof end hatches, no car end ventilation grilles; full length rain guttering at the Cantrail level instead of only over the doors; cast alloy tread plates at all doorways and a snow baffle in front of the air horns.
For a small batch of units, numbered from 455901 to 455920, there were a surprising number of modifications and variations. The first was the traction control system. 455901 to 455911 and 455913 to 455915 were fitted with conventional style camshaft control but with tread brakes instead of discs, whilst 455912 and 455916 to
455920 were fitted with ‘Chopper’ Thyristor control, which was the fore-runner of the system used on later units such as the Class 319 EMUs. Being a new design, the ‘Chopper’ units were a real headache to the operating and maintenance department, with unreliability and failures commonplace. In 1985, a reorganisation of stock saw an order to transfer an increasing number of 455s from South Western to South Central services and reallocated from Wimbledon to Selhurst depot. The ‘Chopper’ fitted units were top of the list to be sent away from Wimbledon, but in the end, they were ordered to be kept at Wimbledon and ultimately 455801 to 455846 went to Selhurst.
Other variations were: TSO 71731 and 71732 which had modified interiors and plug style doors for potential Crossrail units in the early 1990s that were dropped as it was found that the bodyshell strength was compromised. These cars changed between units, being found in 455905, 455912, 455918 and 455920 at different times. Gradually, the Class 455/9 fleet settled down into operations with Network SouthEast, gaining the trademark ‘toothpaste’ livery. The only permanent changes to formation were when 455912 was sent to Eastleigh for overhaul in December 1998, the TS, 71731 was removed (and eventually scrapped in 1995), being replaced with 67400, a heavily modified former DEMU car from 210002. This car is identifiable by having a Water tank hatch on the roof and ventilation grilles as one end of the car. 71732 had been rebuilt back to standard sliding door design some time previously. More recently, 5913 was damaged when a loaded cement mixer careered off a bridge near Guildford and crushed the roof of the MS coach, which appears a write off at the present time.
At privatisation, the South Western 455s were transferred to the control of Stagecoach Trains under the SouthWest Trains brand, operations remaining the same, although a modified Network South East livery with an orange stripe gradually spread across the fleet. In 2005, apart from 455904, which had been treated as a prototype refurbishment, the 455/9s started to be cycled through Ashford works for a rebuild. In addition to the new interior, corrosion treatment and repaint in SWT red livery, this involved standardising the units design and all 20 units now have standard camshaft traction control.
The Model

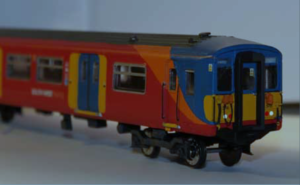
The Class 455/9 kit follows in Bratchell’s now familiar standard practice of ABS mouldings for the roof, sides, floor and ends and shares common parts with most of the York build EMUs. To start with, I removed the moulding pips from inside the roof and sides and following the instructions, used Butanone solvent to construct the bodyshell. When plenty of time (I allow at least 12 hours) has been allowed to pass to allow the joints to set solid, modifications were made to the front end. Notches 1cm long were cut and filed on both front corners and were drilled to accept 0.3mm diameter brass wire to represent handrails, 0.5mm holes were drilled on the front face of the cab next to the notches, and InterCity Models brass air hoses were added as they have the larger diameter needed to look correct.
A mix of Heljan and Hornby multiple working connectors were added to the cab front to represent the ‘plumbing’ that is part of the Electro-Pneumatic multiple unit control used on the 455s. The former marker lights were then removed from the light mouldings as these were removed from the prototype at refurbishment. Turning to the roof, additional detail was required, with ventilators and bases being scratchbuilt from evergreen styrene strip, glued into recesses cut into the roof corrugations. A cab ventilator and cab radio antenna was also added to each driving car and a pair of additional antennas to the MS coach. The next step is to remove the short guttering strips above the doorways and add Evergreen 0.5mm strip at the joint between the roof and the sides, each strip having a 45 degree chamfer at each end per the prototype. Bolster plates were then added to the MS and jacking plates to the other vehicles, using Evergreen angle stock glued to the tumblehome with solvent.
On the MS, the shore/traction supply sockets were added to the left hand side of each end and Vitrains ETH sockets modified to act as the socket with 0.3mm brass wire bent up to represent the conduit. To represent the door control cocks on the MS and TS, Hurst Models etched brass central door locking details were superglued to both sides of one end only. Finally, 0.4mm holes were drilled both sides of each cab door to allow the grabrails to be fitted after painting. Final construction work to be done includes building the bogies, (but removing the moulded on Yaw dampers first) and adding the underframe detail to all cars. The instructions give a general layout of the equipment and some of the locations appear to be incorrect although this may vary from unit to unit on the prototype! After cleaning up the bodyshells with extra fine wet and dry, a good wash with Cillit Bang being used as a degreaser (as unlike Washing Up liquid, it does not contain Lanolin oil which can stop paint adhering successfully).
After masking off both the front and rear of the clear plastic cab front glazing, a coat of Halfords grey primer was applied and then Phoenix Precision post 1999 warning panel yellow was sprayed on the cab front and sides and next to each passenger compartment bodyside door. After allowing at least 24 hours drying time, a set of masking templates was made using styrene sheet as a jig and these were then applied next to the doors and to the cab sides. SouthWest Trains orange was then sprayed and after a further 24 hours, masked up to allow SWT Red to be sprayed. Finally SWT blue was applied to the doors and cab roof and sides, with Falcon grey to the roof and black to the inner ends and roof pelmet. Details were then picked out such as the door treads in Aluminium and a coat of gloss varnish was sprayed and allowed to set for at least 48 hours. At the time that I was painting the kit, SouthWest Trains lettering, logos and numbering were not available, however after speaking to John Peck at Precision Labels, and taking surreptitious measurements at Waterloo station, a set of waterslide transfers for 455916 with logos, numbers, data panels, pictograms, destination blinds and door button labels was created and look spot on.
These were duly applied to the unit and Fox Transfers orange cantrail striping was used for both the central and for the cheatline down the side of the unit. Yellow decaling for the door treads was sourced from a Microscale decals sheet and once dry, all transfers were dosed with Microscale Decalset to tuck them firmly into position. Once dried a coat of Satin varnish was sprayed on, the cab front windows were unmasked and tidied up, final detail painting and weathering was applied and the windows frames were painted with Aluminium and then applied using Solvent. Attention next turned to powering the unit and Charlie Petty at DC Kits provided a Black Beetle motor bogie (12mm wheelsets) for the MS and with 10.5mm wheelsets for the three other cars. Hurst Models etched stainless steel discs were then added to give the wheelsets that ‘Bling’ effect (!) To complete the unit, Kadee number 5 couplers were bolted into mounting pads crafted from styrene block which were drilled and threaded with Kadee 2-56 drills and taps to provide a strong mechanical fastening of the couplers to the frames.

To sum up, the kit provides a good base to build a reasonable replica of these ubiquitous units and a stepping stone for modellers to detail/rebuild to their chosen taste and also use as a base for modelling other 455s such as using a No Nonsense Kit Class 508 TS to make a Class 455/7. It also goes to show that there is definitely a market for modern outline EMU kits and Ready to Run models and hopefully the number of quality products available will increase in the future!
Scale & gauge: 4mm:1ft, 26.5mm ‘OO’ gauge
Class 455/9 Electric Multiple Unit Kit BM84559
Manufacturer: Bratchell Models, PO Box 22, Watford, Herts WD17 3WA www.bratchellmodels.co.uk
Description: Kit with ABS mouldings, bogies and parts. Requires 12mm wheels, couplings, paint & transfers to complete.
Additional Key Parts list:
Black Beetle 3512 motor bogie
Hurst Models BTK100 – Etched Stainless Steel Disc brake inserts
Phoenix Precision paints: P232 SWT Blue, P233 SWT Red, P234 SWT Orange, P257 Railtrack Warning Yellow (April 1999 onwards), P983 Aluminium
Read Chris’s other blogs – including building a 456, and MLV/Class 419.
Thursday Track Nights
We are open on Thursday evenings from 7pm to 9pm at our Keen House clubrooms. Visitors are welcome, please come along and introduce yourself.
Address:
Keen House, 4 Calshot Street, London, N1 9DA
Become a member


